
How to Clean Kitchen Exhaust Fan Properly?
While the aromas from cooking fill the kitchen, grease, smoke, and grime build up inside the exhaust fan. If this buildup is not checked, it will reduce the efficiency of your exhaust fan, increase energy consumption, and, in the worst cases, lead to a fire risk. Regular cleaning improves air quality while keeping your kitchen safe and functioning.
Whether you’re doing routine maintenance or preparing for a deep clean as part of professional bond cleaning Port Macquarie, knowing the right steps can make the job easier. This guide will walk you through the proper cleaning process of your exhaust fan and ensure a fresh, hygienic cooking space. A well-maintained fan prevents stubborn grime from hardening, making future cleaning less time-consuming. With the right approach, you can keep your kitchen exhaust system running efficiently with minimal effort.
1. Gather Your Cleaning Supplies
You want to have everything on hand before you start. The right equipment makes cleaning go way more smoothly. To clean your exhaust fan, you will need:
- A screwdriver if the cover of your fan has to be removed
- Warm water and dish soap
- Baking soda or white vinegar
- Degreaser spray
- Soft brush or sponge
- Microfiber cloths
These common household items cut through grease effectively to get your exhaust fan working again.
2. Turn Off the Power and Remove the Cover
Before cleaning, switch off the power for safety. If your exhaust fan cover is removable, gently unscrew or unclip it. Wash it in warm, soapy water to remove all grease buildup. Before reattaching, stubborn stains should be cleansed with a brush or sponge, washed, and dried. Clean your cover’s vents for proper ventilation.
Check for damage or cracks, as worn-out covers may need to be replaced in order to function properly. After removing the cover, check the fan’s edges for any accumulation of dust or oil. In addition to enhancing productivity, a well-kept cover keeps your kitchen clean.
3. Clean the Fan Blades

Fan blades collect grease over time, reducing their ability to circulate air. Wipe them down with a degreaser or a vinegar and baking soda solution. For thick grease, let the cleaner sit for a few minutes before scrubbing. Avoid using excessive moisture near the motor to prevent damage. Use a soft brush or an old toothbrush to reach tight spots where grime tends to accumulate.
Once cleaned, dry the blades thoroughly to prevent dust from sticking to any remaining moisture. If the blades are particularly worn or bent, consider adjusting or replacing them to maintain optimal airflow. Regularly cleaning them not only improves efficiency but also helps reduce strain on the motor, extending the life of your exhaust fan.
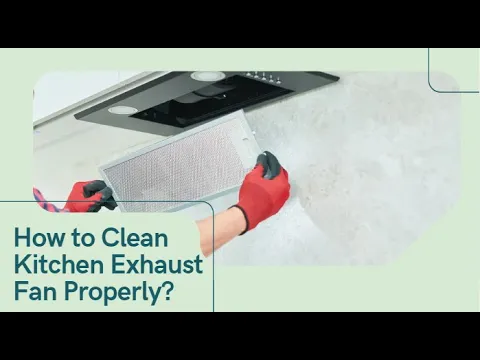
4. Wash or Replace the Filters
Most exhaust fans have metal mesh or charcoal filters. Remove metal filters and soak them in hot, soapy water with baking soda. Scrub gently, rinse and dry before reinstalling. If your exhaust fan has a charcoal filter, check the manufacturer’s instructions, as these usually need replacing rather than washing. A clogged filter restricts airflow, making the fan work harder and reducing its efficiency.
Regularly checking and maintaining the filters helps extend the lifespan of your exhaust system and keeps your kitchen free from lingering grease and odours. For best results, let the filters dry completely before reinstalling them to prevent moisture buildup. Keeping filters clean also reduces strain on the motor, ensuring the exhaust fan runs smoothly and quietly.
5. Wipe Down the Housing and Motor Area
Use a damp microfiber cloth to clean grease and dust from the fan’s housing. Be cautious around electrical components, ensuring everything is dry before turning the power back on. For stubborn grime, use a small amount of degreaser on a cloth, but avoid spraying directly onto the motor. Pay attention to vents or openings, as blocked airflow can reduce performance.
Regularly wiping down the housing prevents buildup and helps the exhaust fan operate more efficiently over time. Check for any loose screws or misaligned parts, as vibrations from regular use can cause them to shift. A well-maintained housing protects the internal components, reducing the risk of overheating or mechanical failure.
6. Prevent Future Buildup
To keep your exhaust fan clean for longer, make regular maintenance a habit. Wipe down the cover and blades weekly to prevent grease from accumulating. Clean the filters at least once a month to maintain proper airflow and efficiency. Using a degreaser spray on grease-prone areas helps break down stubborn buildup before it hardens.
Additionally, minimising oil splatters while cooking can significantly reduce the amount of grease that reaches the fan, making future cleaning sessions easier and less time-consuming. Cooking with a lid on pans when possible and using an oil splatter guard can further reduce grease buildup. Developing these small habits ensures your exhaust fan remains efficient, extending its lifespan and keeping your kitchen fresh.
A Guide to Cleaning Kitchen Exhaust Fan

Wrapping up
A clean kitchen exhaust fan improves air quality, enhances efficiency, and reduces fire risks. Whether you’re maintaining it regularly or preparing for bond cleaning in Port Macquarie, following these steps ensures a hassle-free cleaning process. Regular upkeep prevents stubborn grease buildup, making future cleaning quicker and easier.